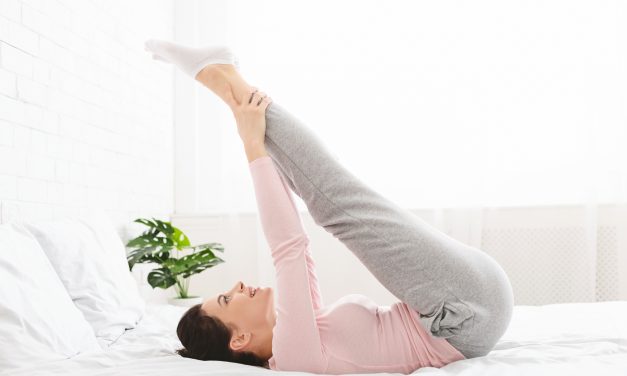
Your Muscle & Strength Authority Site Since 1999

Preworkout Tip for Aching Shoulders

I know this one tip I got from Injury Specialist Rick Kaselj, MS is going to help your shoulder feel better in just minutes. It is called vertical hanging. If it sounds self-explanatory it’s because it is.

Here’s how to do it: Lift your arms straight overhead and take note of how your shoulders feel. Next hang on something like you’re a kid hanging from the monkey bars.

For example: If you are in the gym, go over to the pull up bar, grab the handles, and let yourself hang from them. If you are not able to bring your arms very high, bring them to a point as high as you can and then hang with partial weight.

It might feel a little weird and be a little uncomfortable but hang for 15 seconds with all of your body weight off the ground or partial weight off the ground.. Now step away from the bar and lift your arms overhead. Do you have more movement? Do your shoulders feel a little loser?

For most people it will be Yes-Yes.

Here’s why: Over time gravity pulls on our arm. With our arms weighing about 10 lbs, the slow pulling starts to reshape the shoulder into a painful joint by shortening the ligaments in the shoulder. With the vertical hanging, we are stretching the ligaments in the shoulder in order to reshape the shoulder back into a pain-free shoulder.

Isn’t this tip from Rick’s Fix My Shoulder Pain utilizing the SR3 Method cool? I do this before my workouts while I am priming up my body for my workout. Give it a try this weekend!

What Is The SR3 Method TM?

The SR3-Method is short for “Shoulder Reshaping 3-Part Method”. It was invented by Injury Specialist and Kinesiologist Rick Kaselj, MS who has over 16-years of hands on experience, and a masters degree in exercise science.

The “Traditional Shoulder Pain Model” involves endless cycles of appointments, investigations, stretching and strengthening.

Important: Neither Strengthening nor Stretching Will Help You Until The Shoulder Joint Has Been Reshaped Into a Pain Free Joint.

After having hundreds of Rick’s clients follow this model with minimal success, he needed to find a new model that breaks the traditional shoulder pain model and moves clients from painful shoulders to pain-free shoulders.

This led to the creation of the SR3 Method which is based on one key concept: Reshaping your shoulder from a painful shoulder joint to a pain-free shoulder joint.

I know it sounds amazing but let me show you how you can do this for yourself and have your painful shoulder move into a pain free shoulder.

Part 1: Alignment:

The first part of the SR3 method involves using the concept of alignment. In order to begin reshaping your shoulder you need to make sure your shoulder joint is in ideal centration – the best possible position. The SR3 method will show you how to do this.

Part 2: Tissue Quality:

The second part of the SR3 method is improving tissue quality. With ongoing pain and injuries the tissues change over time. This leads to the shoulder reshaping into a painful shoulder joint. This could cause dysfunction, less movement, poor circulation, less malleable muscles, stiffness around the shoulder joint and tight ligaments.

This all ends up affecting the positioning of the shoulder blade, leading to the shoulder blade changing its tilt. This biting tilt leads to the most common shoulder injury – a rotator cuff injury. The SR3 method will show you how to reposition this tilt and experience a pain free shoulder.

Part 3: Activation & Endurance:

Activation is turning on the right muscle in the shoulder to decrease the stress on the rotator cuff, provide stability to the shoulder joint and allow you to layer on strength to your shoulders.

Finally, and something that is often overlooked, is the concept of endurance when it comes to a shoulder pain relieving program. The reality is your shoulder muscles to be able to work for a long period of time in order to prevent the shoulder joint into reshaping into a painful shoulder joint again. By focusing on endurance you can ensure the shoulder joint muscles will hold the shoulder joint in a pain-free position after shoulder reshaping has occurred.

Click Here For Fix My Shoulder Pain
 

How To Assess Your Squat

Guest Post By Rick Kaselj Creator of Muscle Imbalances Revealed

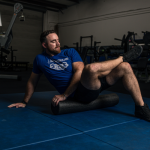
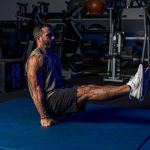
There is a good chance you have been doing the squat wrong for a long time.  The squat builds leg strength and shape but also it is important in saving those knees.  You want those knees to be happy so you can keep lifting for a long time.

Lets test to see if you are doing the squat all wrong.

Do this Test to See If You Are Getting the Most Out of Your Squat

Look in the mirror or have someone look at your squat.

Perform a bodyweight squat.

Look to see how far down your hips go.

Do your hips stay above your knees or do they dip down past your knees?

If your hips do not dip past your knees, you are not getting the most out of your squat and you are not helping strengthening knees and hips in order to protect your knees.

Lets chat about why letting your hips pass your knees is important.

Knee and Hip Strength Through Full Range

You want to build strengthen around the knee and hip through full range of motion.  If you are stopping, just above the knees, you are not building full strength in the hips and knees which leaves the knees exposed to injury when the hips pass the knees.  The hips pass the knees often when you are doing day to day things and working.

If you let the hips pass the knees, you strengthen the knees over a larger range of motion plus you work the hamstrings, hip flexors and gluteus maximus which all help in decreasing the stress on the knees and keeping the knees happy.

Testing Out the Squat to See if It will Help You

You can test out what I am talking about.

With your non-dominant hand, grab something very stable like a squat rack or door frame.  Lean back and move into a squat position.

With your dominant hand feel the muscles around your knee and hip area.

Do a few repetitions of the squat and make sure to see what is happening with your quadriceps, hamstrings, hip flexors and gluteus maximus.

Perform the squat to different heights.

Try a half squat.

Try a squat with your hips above your knees.

Try a squat with your knees in line with your hips.

Try a squat with your hips below your knees.

What happened to your knee and hip muscles at different depths?

Did you feel an increase in activation of the quadriceps, hamstrings, hip flexors and gluteus maximus when hips pass your knee?

If yes, keep reading on.

What Can You Do About it?

You have done the assessment, now it is time to do a few exercises that will help out.

Finger Squat

A finger squat is a bodyweight squat that will help you build strength around the knee and hip during greater range of motion.

Start in a squat foot position and place your palms together, in front of you.  Keep your arms straight and squat down to a point in which your fingers touch the ground while looking straight ahead.  When you touch the ground, return back to the starting position.

Performing the finger squat will force you to dip your hips below your knees so you strengthening at a greater range of motion of your knees and your hips.

You can do this as a warm-up to your leg program or you can do this at the end of your leg program as a recovery.

Front Squat Hip Dip

Adding a twist to the front bar squat.  For your first set, start off with a warm-up weight.  Perform the front squat and work on dipping those hips past knees on the bottom position.  I am not saying bring your seat to your heels, just dip them past.  You will feel how the squat changes when you do this.

Doing this with the front squat, based on where the bar is, it allows you to lean back more and activate your gluteus maximus muscles which is important for hip health but also knee health.

Wrapping Up

Test out your squat to see if you are going deep enough.  If you are not going deep enough, you are not strengthening your knees in order to prevent injuries and you are not strengthening the hips in order to keep them strong and decrease the strain on your knees.

Make sure to test out your squat depth and give the finger squat and front squat hip dip a go to help improve your squat depth in order to make your knees happy for the long haul.

Hears to getting strong and to happy knees.

Rick Kaselj, MS


Are You A Fitness Professional That Needs To Earn CECs and CEUs?
Take Rick’s Home Study Course “Muscle Imbalances Revealed – Assessment & Exercise”

Muscle Imbalances Revealed Review

August 15, 2012 by  
Filed under Injury Reviews

by Mike Westerdal

The word ‘balance’ generally refers to an even distribution of weight or a state of equilibrium. Balance is something that most of us strive to achieve every day of our lives, in just about every aspect of our lives—especially when it comes to weight training and maintaining the health of our bodies. In contrast to balance, ‘imbalance’ is a state of being out of proportion or equilibrium. At the very least, being in a state of imbalance is frustrating and distracting.

In terms of strength training, the term imbalance is often used to refer to a muscle or body part that it is not functioning as well as it should be. When an injury occurs or a system is not working properly, it places the body into a state of imbalance because it is no longer in a state of equilibrium.

For example, a torn rotator cuff in the shoulder results in a state of imbalance because the injury inhibits you from performing many of the exercises and movements you would normally be performing.

For many of us, one of the biggest difficulties of being in a state of imbalance is identifying the cause or condition that placed us there in the first place. In other words, we know that we’re in a state of imbalance but we’re not entirely sure what happened to cause the condition of imbalance. And if you don’t know exactly what the problem is, there is no way you can figure out how to treat it.

This is precisely the reason Muscle Imbalances Revealed: Assessment and Exercise was developed. MIRA was developed by four well-known fitness pros—Nick Rosencutter, Anthony Mychal, John Izzo and Rick Kaselj—who say that the program offers a “complete guide of assessments and exercises to help pin point problems and fix dysfunction in order to bust through fitness plateaus and get faster results.

Unlike most programs, MIRA takes a different approach in that it is almost entirely presented in a series of 12 video presentations that can either be streamed or downloaded for later viewing.

The overall MIRA program blends proper training and proper soft tissue work to enhance the speed at which people recover from injuries.

The first video is entitled Muscle Imbalances and the Performance Client: Assessments and Exercise Progressions to Improve Performance and Prevent Injury. This first one—as well as the next two—is narrated by Nick. The first part of the video is focused on helping you assess your body and uncover the root of the problem that you may be facing.

He does an excellent job of walking you through the assessment process, teaching you how to understand the difference between various symptoms, which allows you to then determine the correct underlying cause. Next, he gets into the actual assessments that he uses to pinpoint problems. The ‘Thomas Test’ is one assessment that he uses. He provides step-by-step instructions that show exactly what you need to do to perform the assessment. Afterwards, he moves on to the exercises you can do to address the problem.

Assessment and Exercise for Athleticism is the title of the next video set. This one is narrated by Anthony Mychal. In this video, Anthony focuses on identifying and eliminating muscular imbalances that inhibit overall athleticism. The following presentation is headed up by John Izzo and is entitled Assessment and Exercise for Personal Training. John’s presentation focuses on Assessments for Optimal Health. This presentation is primarily geared towards personal trainers. Its purpose is to help them to help their clients to achieve their personal fitness goals.

Rick takes the lead in the next video presentation, which is called Assessment and Exercise for Injury Rehabilitation. This one of course emphasizes assessments to identify injuries, followed by exercises and movements to alleviate the problems. One presentation is focused on knee injuries and another targets the back.

The rest of the videos are very similar with each of the guys narrating the presentations that cover his particular areas of expertise. All of the presentations follow the same basic format, beginning with an introduction before moving on to the assessments and then the exercises. Each video includes a handy PDF outline that covers major points of the presentation. These are great for taking notes and following along.

Be forewarned though—MIRA is not for everyone. The program is really designed for persons who already have a working knowledge of the body and muscular systems.

MIRA is not set-up for the casual workout enthusiast. Overall, I think MIRA would be a wise investment for someone who is looking to improve his skills. The all-video presentation style could be a little cumbersome for some people but the quality of the program makes it well worthwhile on https://www.locksmithspros.com/residential.

Overall It’s A Great Home Study Course That Will Give You A Huge Competitive Advantage In Your Field While Providing Better Results For Your Clients

Muscle Imbalances Revealed – Assessment & Exercise

A few people asked if they could get a look into Assessment & Exercise, here are 6 clips from A&E, enjoy.

Before I get to the clips from Assessment & Exercise, John Izzo shares with you what he goes through in his presentation:


Component #1 – Assessment & Exercise for Performance with Nick Rosencutter / Length – 1:27:03


Component #2 – Assessment & Exercise for Athleticism with Anthony Mychal / Length – 1:35:01


Component #3 – Assessment and Exercise for Personal Training with John Izzo / Length – 1:10:14


Component #4 – Assessment and Exercise for Knee Injury Recovery with Rick Kaselj / Length – 40:29


Plus there is:

  • The VIP coaching call which we will be setting up
  • You can earn Continuing Education Credits (CECs or CEUs)
  • Additional presentation that I am going to do on Assessment & Exercise for Back Injury Recovery

Discover the Secret Assessment and Exercises to Help Bust Through Fitness Plateaus, Get Faster Results, Rapidly Recover from Injuries and Improve Performance Without Ever Leaving the Comfort of Your Own Home!
http://criticalbench.com/goto/MuscleImbalances